
That persistent drip from your guttering isn't always a sign of failed sealant; it is more likely a sign that your home is reacting to the weather. Most people assume a quick dab of silicone will solve the issue, but learning how to fix a leaking gutter joint correctly involves accounting for thermal expansion. That rhythmic tapping during a downpour and the sight of damp staining on your brickwork can be incredibly frustrating. We know you want a home that feels secure and well-maintained without the constant worry of water damage.
In this guide, we will show you how to identify the source of the leak, clean the joint properly, and apply a seal that lasts. With rainfall levels predicted to rise by 20% in 2026, your drainage system needs to be in peak condition. We'll walk you through the process step-by-step so you can achieve a dry, functional guttering system. You will also learn how to spot the difference between a simple DIY fix and a situation where calling in a professional is the safest choice for your home and your peace of mind.
Key Takeaways
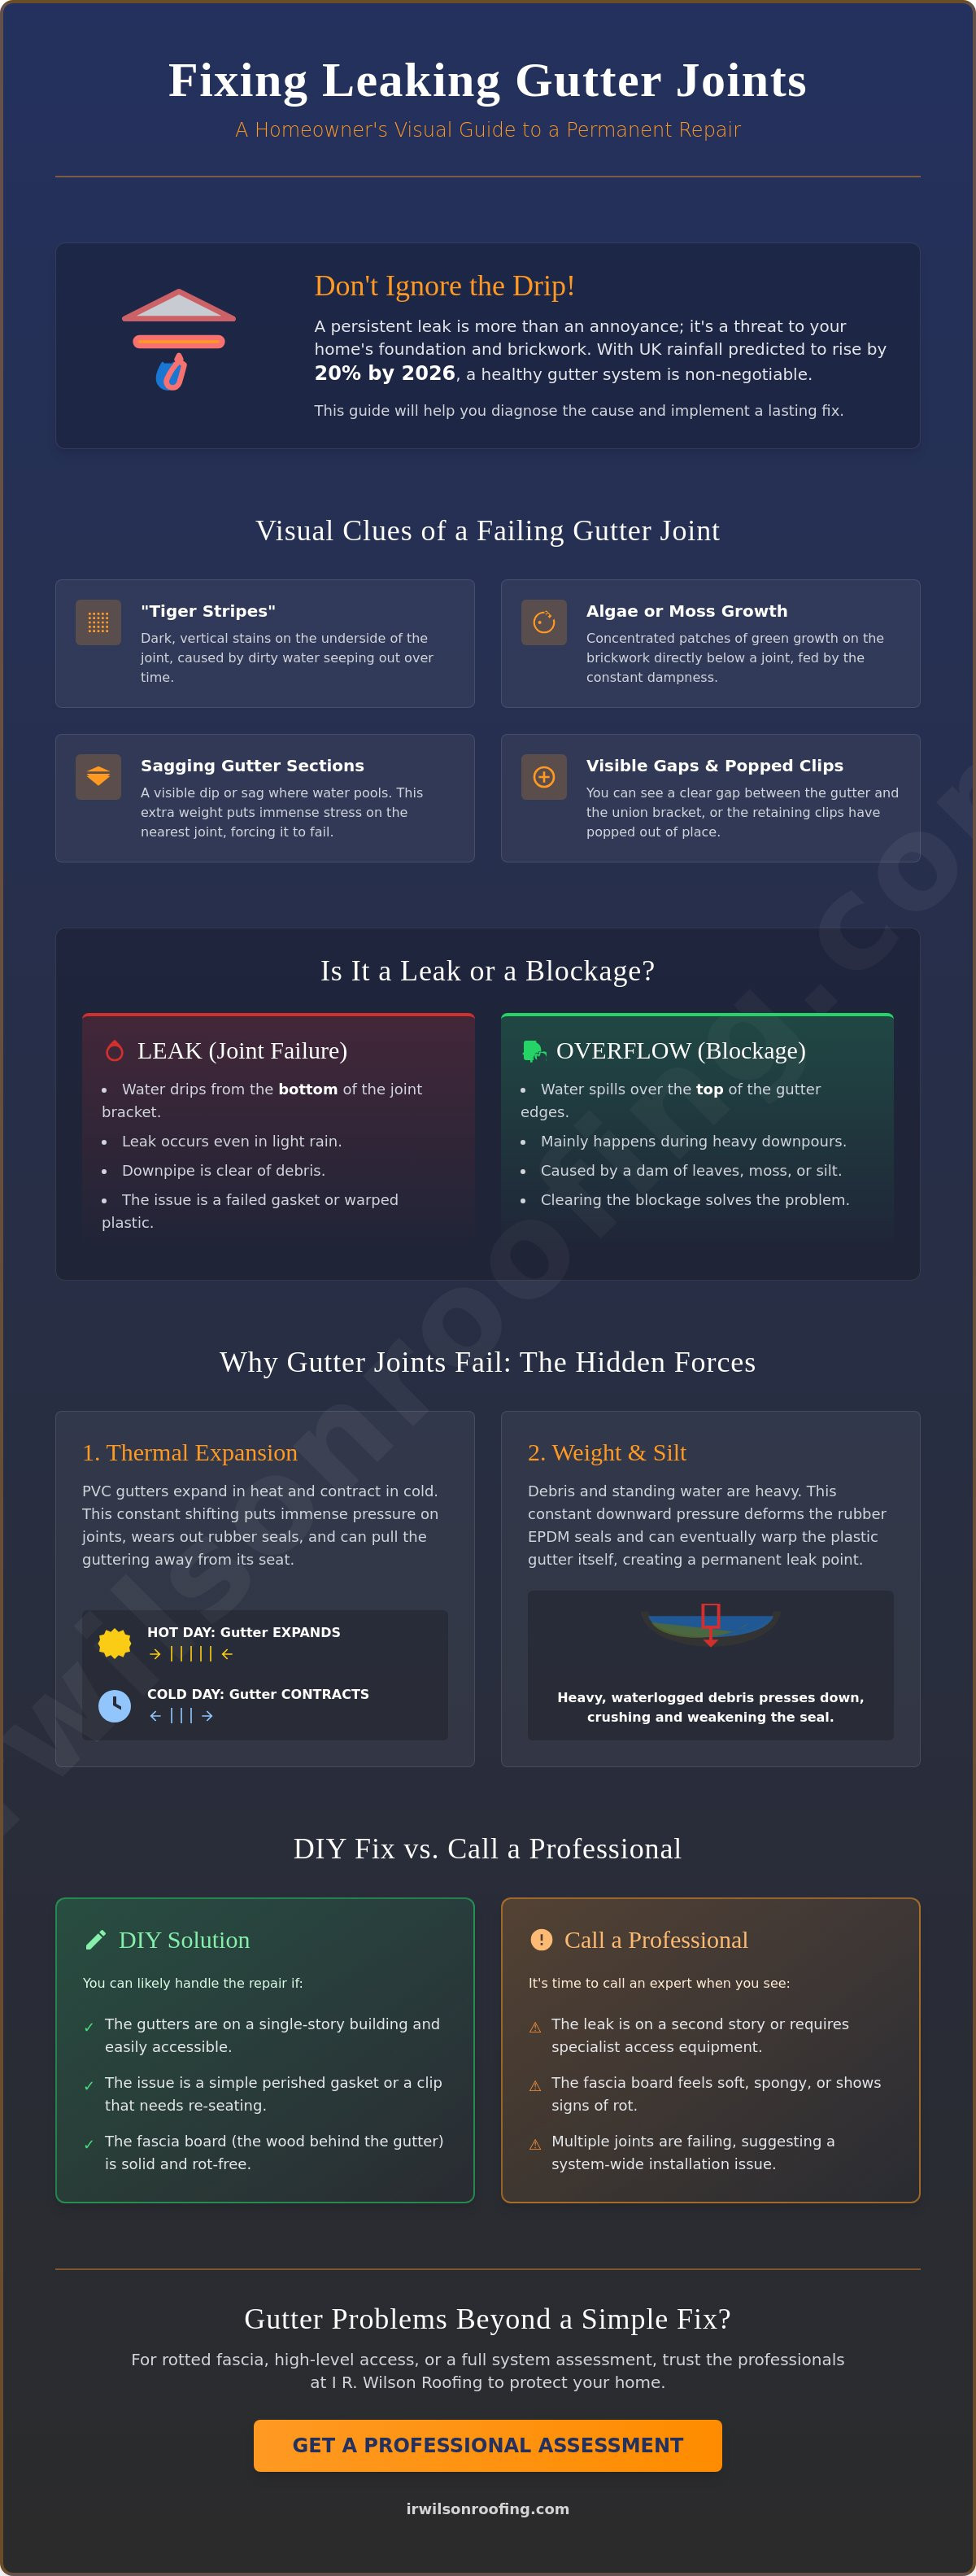
- Learn to spot the subtle signs of joint failure, such as "tiger stripes" or algae growth, before water damage reaches your brickwork.
- Understand how thermal expansion and perished gaskets cause most leaks, so you can solve the root problem instead of just applying a temporary patch.
- Follow our methodical steps on how to fix a leaking gutter joint, including the best way to clean and re-seat union clips safely.
- Identify when a leak indicates deeper issues like rotted fascia boards that require professional attention and specialized equipment.
- Implement a seasonal maintenance schedule designed for our local weather to keep your guttering functional for its full 25-year lifespan.
Assessing the Drip: Identifying Why Your Gutter Joint is Leaking
Identifying the source of a leak is the first step in ensuring your home stays dry and protected. Before you can determine how to fix a leaking gutter joint, you need to look for the specific clues that the system has failed. A foundational step in understanding rain gutter systems is recognizing that they are designed to move water efficiently away from your foundations. When a joint fails, it often leaves a "calling card" on your property, even during dry weather.
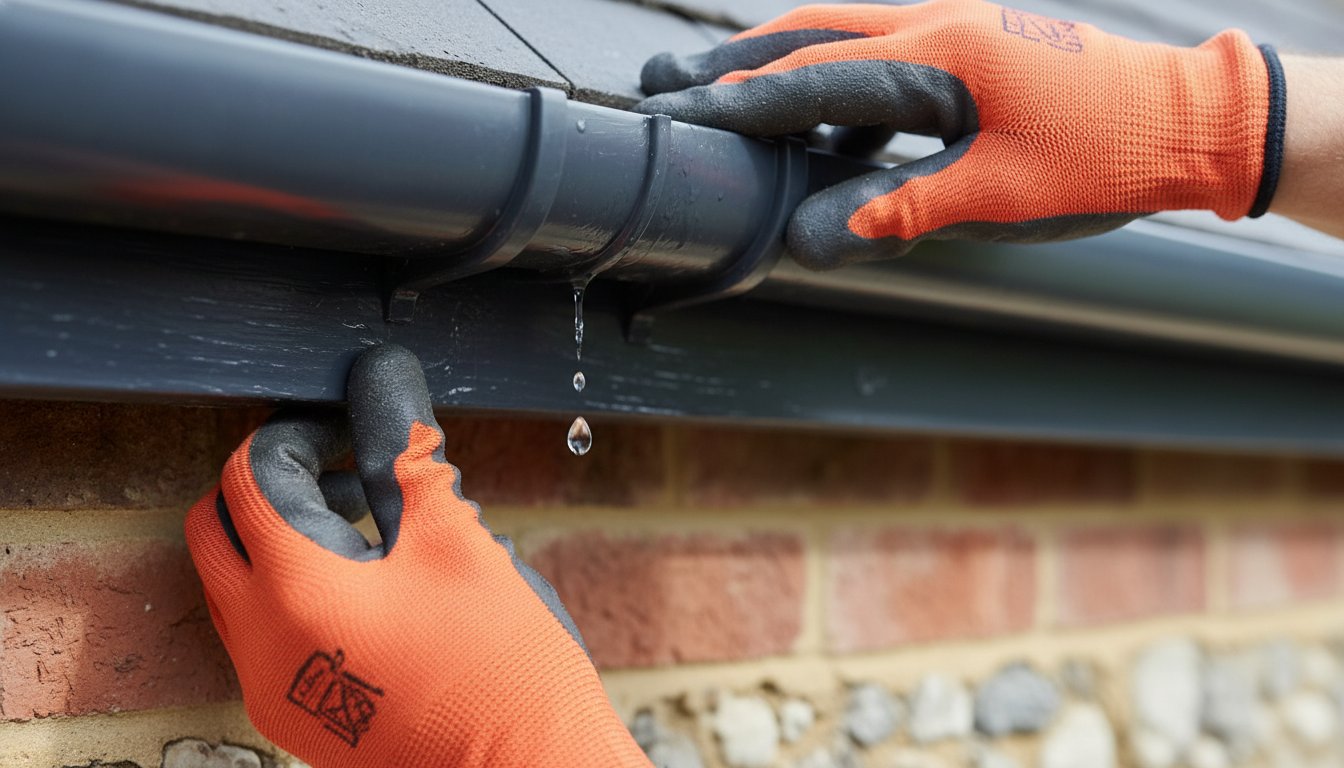
You should look for "tiger stripes" or dark, vertical staining on the underside of the union bracket. These marks are caused by dirty water seeping through a perished seal over time. You might also notice concentrated patches of green algae or moss on the brickwork directly below a joint. If you are inspecting the system during a dry spell, look for sagging sections where water might pool; this extra weight often forces a joint to fail. For your safety, always use a ladder stand-off to avoid crushing the guttering or losing your balance while working at height.
To better understand this concept, watch this helpful video:
Common Signs of a Failed Joint Seal
A failed seal often shows clear physical symptoms that you can spot from the ground or a ladder. You might see visible gaps between the gutter length and the union bracket where the plastic has warped or contracted. Water dripping from the bottom of the bracket, rather than the end of the run, is a classic sign of a failed internal gasket. In some cases, you may even find clips or screws that have popped out entirely because the house or the guttering has shifted slightly over the years.
Distinguishing Between a Leak and an Overflow
It's easy to mistake a simple blockage for a broken joint. Before you start dismantling parts, check if the joint is just being overwhelmed by debris. Silt and leaf build-up can create a dam that forces water over the edges of the union. We always recommend checking the downpipe outlets first. If the downpipe is clear but water still escapes the joint during a heavy downpour, the seal is likely the culprit. This distinction is vital when deciding how to fix a leaking gutter joint effectively without wasting time on unnecessary replacements.
The Root Causes of Gutter Joint Failure in UK Homes
While a drip might seem like a simple mechanical failure, your roofline is actually a dynamic system under constant environmental stress. Most homeowners assume a leak is just the result of old age, but the primary culprit in the UK is often thermal expansion. Understanding these physical forces is essential when you are learning how to fix a leaking gutter joint, as a repair that doesn't allow for natural movement will likely fail during the next change in season.
PVC gutters are surprisingly sensitive to temperature. In the Norfolk sun, a standard four-meter length of guttering can expand by several millimeters between a frosty morning and a peak summer afternoon. This constant shifting puts immense pressure on the union brackets. We recommend adding a thorough roofline inspection to your seasonal maintenance checklist to catch these minor shifts before they turn into structural damp issues.
Why Temperature Changes Kill Gutter Seals
PVC expands and contracts at a much higher rate than the brickwork or timber it is attached to. This causes the guttering to "creep" or slide back and forth through the union brackets. Over time, this movement can pull the guttering away from its rubber seat. South-facing gutters are particularly vulnerable because they endure the most extreme temperature swings. If your guttering was installed without proper expansion gaps, the plastic has nowhere to go, which eventually forces the joints to buckle and leak.
The Impact of Weight and Silt
Standing water is heavy, and it isn't just a symptom of a leak; it's often a contributing cause. When water pools at a joint, it puts persistent downward pressure on the EPDM rubber seals. This pressure is exacerbated by the accumulation of silt and roof grit. These fine particles act like sandpaper, slowly eroding the gasket every time the guttering moves. Regular gutter cleaning is the best way to remove this abrasive sludge and protect the integrity of your seals.
The lifespan of standard rubber gaskets in the UK is generally quite long, but they eventually lose their elasticity and become brittle. When the rubber can no longer compress and rebound, the watertight seal is lost. If you find that your seals are consistently failing despite regular cleaning, you might want to explore our latest roofing insights to see if a more robust system is needed for your property. We believe in doing the job right the first time, which means addressing these root causes rather than just patching the symptoms.
Step-by-Step: How to Fix a Leaking Gutter Joint Yourself
Once you've identified the source of the drip, the repair process requires a methodical approach. The most common mistake homeowners make is rushing the preparation phase. If you want to know how to fix a leaking gutter joint so it stays fixed, you must start with a clean surface. Use a stiff brush and warm, soapy water to scrub the inside of the union bracket and the ends of the gutter lengths. Removing every trace of silt, moss, and old, crusty sealant is the only way to ensure your new seal creates a watertight bond.
After cleaning, you must carefully release the union clips. PVC that has been exposed to the elements for years often becomes brittle. Apply steady, gentle pressure to the clips to avoid snapping the plastic. If a clip does break, the entire union bracket will usually need to be replaced. Once the joint is open, inspect the rubber gasket. If it's simply displaced or dirty, you can often clean and re-seat it. However, if the rubber feels hard or shows visible cracks, a replacement is necessary to prevent the leak from returning.
Replacing the Rubber Gasket
To replace a perished seal, you must first identify your gutter profile. Most UK homes use half-round, square, or ogee shapes. Sourcing the exact match is vital because a gasket that is even slightly too thin will fail immediately. Carefully pry the old seal out of its channel using a flat-head screwdriver, taking care not to gouge the plastic housing. Press the new gasket firmly into the groove, ensuring it sits flush and isn't twisted at any point. This provides the factory-standard finish required for long-term reliability.
Using Sealants Effectively
We strongly advise against using "instant" repair tapes. While they are marketed as a quick fix, these tapes often lose their adhesive properties within a single season. Instead, ensure the plastic is bone-dry and apply a high-quality, low-modulus silicone. This specific type of silicone remains flexible after curing, which is essential for managing the thermal expansion we discussed earlier. Apply a consistent bead of sealant only if the original gasket is missing or if the bracket design specifically requires it. Always allow the sealant to skin over before reassembling the joint.
When you are ready to put everything back together, look for the "insert to" marks stamped inside the union bracket. You should never push the guttering all the way into the center of the joint. Leaving this small gap allows the plastic to grow and shrink without buckling. If you find the clips are too difficult to close or the guttering seems warped, it might be time to consider professional gutter repairs to ensure your roofline remains secure. A correctly reassembled joint should click firmly into place, giving you the confidence that your home is once again protected from water damage.
DIY Fixes vs. Professional Gutter Repairs: Knowing the Difference
While many homeowners feel confident learning how to fix a leaking gutter joint, the decision to climb a ladder shouldn't be taken lightly. We see many "weekend fixes" that fail because the underlying issue was more than just a loose clip. A professional repair is often the difference between a system that lasts a single season and one that remains watertight for a decade. Our team approaches every leak with a focus on longevity and structural integrity, ensuring your property is ready for the 20% increase in rainfall predicted for 2026.
Safety is the most significant factor to consider. Working at height requires specific equipment, such as ladder stand-offs and fall protection, which the average homeowner may not possess. Beyond personal risk, there is the risk to your property. If water has been seeping behind the bracket for months, it may have already rotted the underlying fascias and soffits. A professional can identify this hidden decay before it spreads into your roof timbers, saving you from much larger repair bills in the future.
When you evaluate the cost-benefit of a DIY project, remember to include the price of high-quality tools and specialized parts. Balancing these expenses against professional guttering services often shows that expert intervention is more economical. We provide a level of precision that ensures your drainage system handles heavy downpours without putting unnecessary stress on the joints.
When to Call a Professional Roofer
Some situations demand a specialist's touch. If your property features heritage materials like cast iron or requires expert leadwork, a DIY approach can cause irreversible damage. You should also contact us if a leak persists after you have already tried to replace the seal. This often indicates a "silent" failure, such as a hairline crack in the gutter wall or a structural shift that has altered the fall of the entire run, preventing water from reaching the downpipe.
The Risks of Improper DIY Repairs
A common "bodge job" involves applying excessive sealant directly over a leak. While this might stop the drip for a few days, a large glob of silicone can actually block the natural flow of water and trap silt. This creates a dam that causes water to back up and spill over the edges, potentially damaging your foundations. There is also the danger of snapping clips on older, obsolete systems where replacement parts are no longer available. These small mistakes often lead to expensive damp proofing requirements later. If you are unsure about the condition of your roofline, you can request a professional gutter assessment to ensure your home stays protected.
Long-Term Protection for Your Norwich Home’s Roofline
Fixing a drip is a vital immediate step, but protecting your property over the long term requires a more strategic approach. While you now understand how to fix a leaking gutter joint, preventing the issue from returning is the best way to safeguard your home's structural integrity. The Norfolk climate, with its coastal winds and fluctuating temperatures, puts unique stress on your roofline. We believe a proactive maintenance schedule is the most effective tool for avoiding the stress of emergency repairs and damp staining on your brickwork.
One of the most effective upgrades for local homes is the installation of eaves protectors. These simple components sit under the first row of tiles and ensure water is directed straight into the gutter, preventing it from seeping behind the joint and rotting the fascia boards. If you live in an area prone to heavy downpours, upgrading to modern, deep-flow guttering can provide the high-capacity drainage needed to handle the 20% increase in rainfall predicted for 2026. These systems are designed to move water faster, reducing the weight and pressure that often cause joints to fail. Integrating these improvements into a wider roof repair strategy ensures every part of your home remains watertight and secure.
Preventative Maintenance Tips
Consistency is key to a functional drainage system. We recommend clearing debris at least twice a year to prevent the heavy silt build-up that wears down rubber gaskets. During these sessions, check your bracket spacing; if brackets are more than 800mm apart, the guttering may sag, leading to pooling water. A quick application of silicone spray on the seals can also keep them supple and prevent the perishing that leads to leaks. These small actions extend the 25-year expected lifespan of your uPVC system.
Securing Your Home Against Storm Damage
High winds in East Anglia can rattle joints loose, especially on exposed gables. After a significant storm, it is wise to check for "back-fall" where the guttering has shifted, causing water to sit in the joint instead of flowing toward the downpipe. This standing water is a primary cause of seal erosion. For total peace of mind, you can contact I R. Wilson Roofing for a professional roofline health check. Our team will assess the alignment and security of your entire system, providing the quiet confidence that comes from expert craftsmanship and local reliability.
Protect Your Property with a Reliable Roofline
Protecting your home from water damage starts with a clear understanding of your drainage system's needs. We have explored how staining patterns reveal hidden leaks and why thermal expansion is the primary cause of joint failure in Norfolk homes. Knowing how to fix a leaking gutter joint correctly ensures your repairs survive the seasonal shifts between summer heat and winter frost. By following a methodical cleaning and inspection routine, you can maintain a dry and secure environment for your family.
As a family-run business established in 1994, we take great pride in our expert local knowledge of Norfolk rooflines. If you find a repair is too complex or you are worried about working at height, our team is ready to assist. We offer free, no-obligation repair quotations to help you make the best decision for your property. You can Request a Professional Gutter Inspection in Norwich to ensure your home remains protected against the elements. We look forward to helping you maintain a safe and functional home for many years to come.
Frequently Asked Questions
Can I use bathroom silicone to fix a leaking gutter joint?
You should avoid using bathroom silicone for outdoor repairs. Bathroom sealants are designed for internal humidity and don't have the UV resistance or temperature tolerance required for the Norfolk climate. They will quickly become brittle and peel away when exposed to the sun. Instead, you need a dedicated low-modulus roof and gutter sealant that stays flexible as the plastic expands and contracts.
How much does it cost to have a professional fix a gutter leak in Norwich?
The cost for professional repairs depends on the height of your home, the number of leaking joints, and whether any underlying timber has been damaged. While we don't provide fixed rates here, we always recommend getting a tailored quotation for your specific property. A professional assessment ensures that you aren't just patching a symptom but are solving the root cause of the water ingress.
Why does my gutter leak at the joint even after I've cleaned it?
Cleaning the debris removes the weight and potential blockages, but it won't fix a perished rubber gasket. Over time, the EPDM seals inside the union bracket lose their elasticity and fail to create a watertight compression. If your system still drips after a thorough clean, the internal seal likely needs replacing. This is a common step when learning how to fix a leaking gutter joint properly.
Is it better to repair a gutter joint or replace the whole section?
If the gutter lengths are in good condition, a simple joint repair is usually the most cost-effective solution. You can often just replace the union bracket or the rubber gasket to restore the seal. However, if the PVC has become thin, brittle, or shows visible cracks, replacing the entire section is the only way to ensure long-term protection for your home's roofline.
How long should a gutter joint seal typically last in the UK?
A standard gutter joint seal in the UK should last between 10 and 15 years. While uPVC guttering itself can last up to 25 years, the rubber gaskets are often the first point of failure. Factors like extreme temperature swings and the accumulation of abrasive roof grit can wear these seals down faster. Regular maintenance can help you reach the upper end of that lifespan.
What is the best sealant for PVC gutter joints?
The best sealant is a high-quality, neutral-cure silicone specifically formulated for roofing and guttering. These products are designed to bond with PVC and remain highly flexible even in freezing temperatures. This flexibility is vital because it allows the guttering to move without cracking the seal. We recommend choosing a product with high UV resistance to prevent it from breaking down in direct sunlight.
Can a leaking gutter joint cause damp inside my house?
Yes, a persistent leak can lead to serious damp issues. If water consistently drips onto the same spot on your brickwork, the wall can become saturated. This moisture eventually travels through the brick and into your internal plaster, leading to mold growth and structural damage. Addressing how to fix a leaking gutter joint quickly is the best way to avoid these expensive internal repairs.
How do I know what brand of guttering I have to buy replacement parts?
Most manufacturers stamp their brand name or a specific identification code on the inside of the guttering or on the union bracket itself. You can also check the shape of the profile, as most UK systems are half-round, square, or ogee. If you aren't sure, taking a photo or a small offcut to a local trade counter is the most reliable way to find a compatible match.


